
The Water Pump Impeller: The Ultimate Guide to Preventing Engine Overheating
The water pump impeller is often described as the heart of your marine engine’s cooling system. Yet, it remains one of the most overlooked components by boat owners until it is too late. Furthermore, this small, flexible rubber wheel is solely responsible for pumping raw water through your engine block to regulate temperature. Consequently, if this part fails, the results can be catastrophic, leading to warped cylinder heads or a seized engine. Therefore, understanding the mechanics of your cooling system is not just about maintenance; it is about safety. In this detailed guide, we will explore the critical signs of wear, maintenance schedules, and specifically when and how to change a water pump impeller to keep your vessel running smoothly on American waterways.
Understanding the Role: Why the Impeller is Critical
To understand why maintenance is vital, you must first understand the function. The impeller is housed inside the lower unit of an outboard or within the sea-water pump of a sterndrive/inboard. As the engine shaft spins, the flexible vanes of the impeller compress and expand against the pump housing liner. In doing so, this action creates a vacuum that draws water in and forces it up through the cooling passages.
- The Vulnerability: Because it functions through friction and flexibility, the rubber is under constant stress. Moreover, when debris like sand or silt enters the system, it acts like sandpaper, rapidly degrading the vanes.
- The Consequence: Without doubt, a compromised impeller leads to reduced water flow. Even a slight reduction can cause “hot spots” in the engine before the temperature gauge even registers a problem.
The Prevention Principle: Knowing When and How to Change a Water Pump Impeller
The golden rule of boating is prevention. In fact, waiting for a failure while offshore is dangerous. Thus, the goal of this guide is to shift your mindset from “repair” to “proactive maintenance.” Mastering when and how to change a water pump impeller is the most cost-effective insurance policy you can buy for your boat.
Recognizing the Signs of Wear: Listening to Your Engine
Before we dive into the mechanical procedure, we must identify the symptoms. Surprisingly, an impeller rarely fails instantly without giving warnings first. Here are the key indicators that scream for immediate attention:
The Weak “Telltale” Stream (The Pee Stream)
For outboard owners, the “telltale”—that stream of water shooting out the side or back of the motor—is your best friend.
- A Healthy Stream: It should be strong, consistent, and relatively cool or lukewarm.
- A Weak Stream: If the flow is dribbling, misting, or intermittent, then the impeller is likely losing its flexibility or missing vanes.
- No Stream: Immediately shut down the engine. Consequently, continuing to run the motor will cause severe damage within seconds.
Engine Overheating and Alarms
Modern engines are equipped with audible alarms and “limp mode” features. However, relying solely on these is risky.
- Gauge Fluctuations: Watch your temperature gauge. For instance, if the engine runs hotter than usual at idle but cools down at speed, the impeller might be taking a “set” (curved vanes) and failing to pump efficiently at low RPMs.
- Smell of Burning: Additionally, the smell of melting rubber or hot paint is a definite sign that you have ignored the earlier warnings of when and how to change a water pump impeller.
The Replacement Schedule: When and How to Change a Water Pump Impeller
One of the most common questions is: “How long does an impeller last?” While opinions vary, manufacturer recommendations provide a solid baseline. Generally speaking, rubber degrades over time, even if the boat sits in the driveway.
The “2-Year or 100-Hour” Rule
First and foremost, follow your owner’s manual. However, for most recreational boaters in the US, the following comparison table serves as a safe guideline:
| Engine Type | Frequency (Time) | Frequency (Usage) | Condition Notes |
| Outboard (Saltwater) | Every 1 Year | Every 100 Hours | Salt crystals are abrasive and harden rubber. |
| Outboard (Freshwater) | Every 2 Years | Every 200 Hours | Sediment and sand can still cause wear. |
| Inboard / Sterndrive | Every 2 Years | Every 200-300 Hours | Access can be harder, but the risk is the same. |
| After Sitting (Storage) | Immediately | N/A | Rubber becomes brittle and takes a “set” after winter. |
Pro Tip: Even if you have only put 20 hours on the engine in two years, change it anyway. In this case, dry rot is the enemy, not friction.
Step-by-Step Guide: When and How to Change a Water Pump Impeller
Now, let’s get your hands dirty. Although this guide focuses on a standard outboard lower unit (the most common DIY scenario), the principles apply broadly.
Tools Needed:
- Socket wrench set (Imperial or Metric depending on manufacture)
- Screwdrivers
- Marine Grease (Waterproof)
- Replacement Kit (Impeller, gaskets, O-rings, wear plate)
- Rubber Mallet
Step 1: Lower Unit Removal
Initially, ensure the battery is disconnected for safety.
- Shift to Gear: For many engines, you must shift the throttle into “Forward” or “Reverse” to access the shift shaft disconnect. Check your manual for this specific step.
- Remove Bolts: Loosen and remove the bolts securing the lower unit (gearcase) to the mid-section. Note that there is often a hidden bolt under the trim tab (anode).
- Drop the Unit: Gently pull the lower unit down. If it sticks, tap it lightly with a rubber mallet. Do not force it, as you might bend the shift shaft.
Step 2: Accessing the Pump Housing
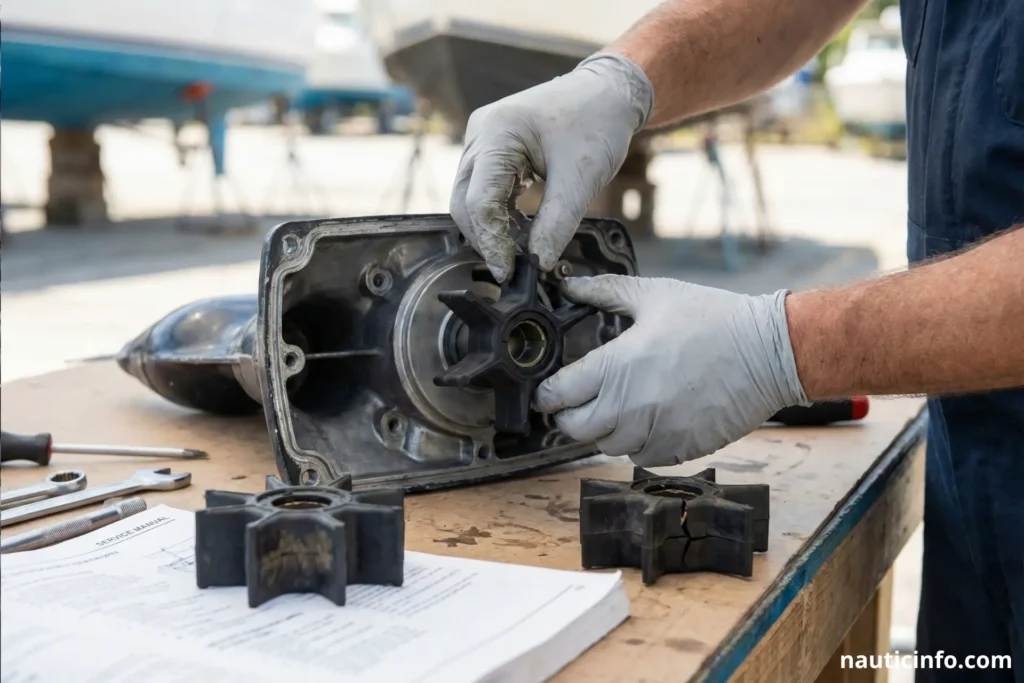
Once the unit is on your workbench, locate the water pump housing on the driveshaft.
- Remove Housing Bolts: Unscrew the four bolts holding the plastic or metal housing down.
- Lift the Housing: Slide the housing up and off the driveshaft. Subsequently, you will see the old impeller sitting on the wear plate.
- Inspect Everything: Crucially, look for pieces of missing rubber. If vanes are missing, you must find them. They are likely lodged in the cooling tubes or thermostat, and failure to remove them will cause blockages.
Step 3: Installing the New Impeller (The Critical Step)
This is the most sensitive part of mastering when and how to change a water pump impeller.
- Clean the Surface: Remove the old gasket and wear plate. Clean the base thoroughly.
- Grease the Shaft: Apply a light coating of marine grease to the driveshaft and the inside of the new impeller housing. Do not use petroleum jelly as it can degrade certain rubbers; stick to marine grease or dish soap.
- The Rotation Direction: Slide the new impeller down the shaft. Here is the trick: As you push the housing over the impeller, you must rotate the driveshaft in the direction of the engine’s operation (usually clockwise).
- Why? This ensures the vanes bend in the correct direction. If you force them in backward, they will flip immediately upon starting, causing premature stress and failure.
- Seal it Up: Install the new O-rings and gaskets provided in your kit. Tighten the bolts to the manufacturer’s specified torque.
Step 4: Reassembly and Testing
Finally, reinstall the lower unit.
- Grease the Splines: Apply grease to the top of the driveshaft splines (but not on the very top tip, to avoid hydraulic lock).
- Align the Tubes: As you lift the unit back up, ensure the water tube aligns with the pump housing and the shift shaft connects properly.
- Test Run: Never start the engine dry. Hook up “earmuffs” with a garden hose or submerge the lower unit in a trash can filled with water. Start the engine and look for that strong telltale stream.
Maintenance Best Practices for Longevity
Now that you know when and how to change a water pump impeller, let’s look at how to make it last longer.
- Flush After Every Use: Especially in saltwater. Salt crystallization acts like shards of glass on the rubber. Flushing with fresh water removes these abrasive particles.
- Avoid “Dry Starts”: Never bump the key to check the battery if the engine isn’t in water. The impeller relies on water for lubrication. Consequently, a few seconds of dry running can melt the tips of the vanes.
- Storage Position: During winterization, leave the engine in the down position if possible. This allows all water to drain out, preventing freezing and expanding inside the pump housing, which could crack the plastic.
Conclusion Change a water pump impeller : Confidence on the Water
In conclusion, the water pump impeller is a small part with a massive responsibility. By understanding the signs of fatigue and adhering to a strict maintenance schedule, you eliminate one of the most common causes of breakdowns on the water.
Ultimately, knowing when and how to change a water pump impeller empowers you as a boat owner. It saves you money on labor costs, prevents thousands of dollars in engine damage, and most importantly, ensures the safety of your crew. So, check your maintenance log today—if it has been more than two seasons, it is time to order that kit and get to work.